Showing posts with label tutorial. Show all posts

Tuesday, 24 January 2012

Miro Video Converter dimension settings explained

Anyone who has used the great Miro Video Converter (ver 2.6) tool for transcoding video into a format that can be viewed in any browser you may care to use might find the encoder settings a little opaque. There's no intuitive way of finding out exactly what dimensions the video you want to process will come out at other than by being familiar with the encoder settings.

The encoder settings are handily listed under the following categories:

Android Devices
 Nexus One
 Dream / G1
 Magic / myTouch
 Droid
 Eris / Desire
 Hero
 Cliq / DEXT
 Behold II

Apple Devices
 iPhone
 iPod Touch
 iPod Nano
 iPod Classic
 iPhone 4 / iPod Touch 4
 iPad
 Apple Universal

Other Devices and Formats
 Playstation Portable (PSP)
 Theora
 WebM (vp8)
 MP4
 MP3 (Audio only)

For some people, these settings may be fairly self explanatory. However, it's still not exactly clear which of the settings will give the best quality output.  What I intend to do in this post is explain what these settings equate to when using a real world example. I'm going to take a piece of video freely available and run it through each of these presets and then post the details of the file size and the dimensions. The video I have chosen is to use is entitled Liquid Skies by Annis Naeem:


The reason I have chosen this video is mainly due to its relatively short length (1 minute 36 seconds)  - encoding video files can take a long time especially when the original file is long and necessarily large as a consequence.

Annis has enabled downloading of the video from his Vimeo page and it comes out as 29.1 MB Flash (.f4v) file. Using the Inspector tool within Quicktime we can see that the actual video dimensions of the file are 960 x 540 pixels, and it is encoded with the AVC Coding codec. We can also see other pieces of information such as the audio codec, frame rate and data rate. This file will be used as the starting point when trying all of the different presets.

Helpfully, when converting the files Miro appends the name of the preset to the new file name. However, there are times when this goes wrong - the Apple presets for the various iPod models all omit the specific device they are intended for so if you want to make multiple copies for different platforms it is advised that you add "nano" or "touch" to the file name to help distinguish between the conversions.

The Android Settings

Below is a list of the video conversion presets followed by the resulting file size of the newly converted video as well as the video dimensions


Android Devices
 Nexus One - 17.5 MB - 800 x 480 (853 x 480 actual)
 Dream / G1 - 8.9 MB - 480 x 320 (568 x 320 actual)
 Magic / myTouch - 8.9 MB - 480 x 320 (568 x 320 actual)
 Droid - 18.8 MB - 854 x 480 (853 x 480 actual)
 Eris / Desire - 8.9 MB - 480 x 320 (568 x 320 actual)
 Hero - 8.9 MB - 480 x 320 (568 x 320 actual)
 Cliq / DEXT - 8.9 MB - 480 x 320 (568 x 320 actual)
 Behold II - 8.9 MB - 480 x 320 (568 x 320 actual)

All of the Android presets came out as .mp4 files using the H.264 video codec, but the audio codec remained unchanged along with the frame rate (29.97). There appears to minimal (if any) difference between the settings for Dream / G1, Magic / myTouch, Eris / Desire, Hero, Cliq / DEXT, and Behold II.

The Apple Settings

Again, below is a list of the video conversion presets for Apple devices followed by the resulting file size of the newly converted video as well as the video dimensions

Apple Devices
 iPhone - 15 MB - 480 x 320 (568 x 320 actual)
 iPod Touch - 15 MB - 480 x 320 (568 x 320 actual)
 iPod Nano - 15 MB - 480 x 320 (568 x 320 actual)
 iPod Classic - 15 MB - 480 x 320 (568 x 320 actual)
 iPhone 4 / iPod Touch 4 - 15.1 MB - 640 x 480 (853 x 480 actual)
 iPad - 15.1 MB - 1024 x 768 (1365 x 768 actual)
 Apple Universal - 15.1 MB - 1280 x 720 (1280 x 720 actual)

As with the Android presets, all the Apple conversions came out as .mp4 files using the H.264 video codec, with the frame rate and audio codec remaining unchanged. The iPhone, iPod Touch, Nano and Classic all outputted the same video file. However the iPhone 4 and iPad outputs varied in video dimensions whilst the file size was slightly larger than the older Apple devices. It looks like the iPhone and iPad presets are optimised for those individual devices (the 'Retina Display'?) whilst the Apple Universal setting seems more geared towards an Apple TV device with its 720 output.

The Other Settings

As above, here's a list of the video conversion presets for the non-Apple/non-Android outputs. Not all the presets were able to convert the original file and the audio and video codecs were sometimes converted to fit the platforms they were expected to work on

Other Devices and Formats
 Playstation Portable (PSP) - file could not be converted
 Theora - 31.7 MB - 960 x 540 - video codec: Theora - audio codec: Vorbis
 WebM (vp8) - 4.4 MB - 960 x 540 - video codec: V_VP8 - audio codec: Vorbis
 MP4 - 17.3 MB - 960 x 540 - video codec: AVC - audio codec: AAC
 MP3 (Audio only) - 1.47 MB

Screengrab of WebM conversion
These presets produced a mixed bag of results. The Theora preset produced the biggest file out of all the presets available and the video footage looked sharp. The opposite can be said for the WebM conversion which produced a blocky and pixelated image, but it did compress the file down to 4.4 MB - the smallest size on test. It was truly awful when dealing with any onscreen motion. The Playstation Portable preset simply refused to work with any video I've thrown at it to date.

Conclusion


It certainly seems that Miro Video Converter contains a number of presets that do much the same thing as others. This is most likely due to the diversity of users with different platforms looking to make video specifically for their device (as in the case of the Android and Apple settings). Given that the generic Android and Apple presets put out video at 480 x 320 it's fair to say that the smaller file sizes reduce the amount of visible detail available, but then they are nearly half the size. This is an expected trade-off in quality.

Miro Video Convertor is a free tool with a tidy interface. If you are looking for a quick and simple  drag-and-drop tool then it will more than likely meet your needs. Just don't expect much in the way of control over the conversions you run through it. For that, you'll want to use something like Handbrake

Tuesday, 23 August 2011

Downloading videos from YouTube tutorial [video]

Every now and then, when making presentations I like to use video material from YouTube. Usually I tend to stream the footage live online, but there are occasions when the Internet fails and you want a hard copy of the footage so you can embed it in your presentation. There's a great little browser extension called FastestTube that works with Safari, Firefox, Chrome, IE and Opera. Check out the tutorial video below which shows you how it works

Monday, 25 July 2011

How to back-up OSX Lion to USB tutorial [video]

In an earlier tutorial I showed how to make a bootable version of OSX Lion (10.7) on DVD for fresh installs. It's also possible to do this via a USB drive for those machines that don't have an optical drive (the Macbook Air and the most recent Mac Mini). It's a little more laboured than burning to disk.  You can find the video tutorial below:

How to back-up OSX Lion to DVD tutorial [video]

Much of the discussions surrounding the most recent Apple software upgrade (OS X 10.7)  refers to the fact that Apple are no longer shipping their product on physical media.  Well, that's not strictly true - they will be producing a $70 USB version sometime in August.  Most people will access the software after having purchased it from the App Store and downloading more than 3.5 GB of data.  This is great in that it makes for a smaller environmental footprint as there'll be less packaging and less fuel-related costs but it does have it's downsides in that you can't reformat or install without an Internet connection.

Never fear, as there is a way to make a backup copy of the software without having to upgrade from OSX 10.6 (Snow Leopard) first.  In the video below I show you how to make a bootable backup up copy of OSX Lion via DVD. It's quite easy.  Click through to YouTube for the HD video.

Monday, 2 May 2011

Note to self #471

When jailbreaking your iPhone be sure to remember where to find the firmware:

~(home)/Library/iTunes/iPhone Software Updates

The amount of times I forget this...

Friday, 8 April 2011

The basics of web design

A couple of weeks ago I posted some tutorials made by Adam Dachis of Lifehacker showing you how to go about starting a video editing project.  This time he's been busy (with Adam Pash) doing much the same thing with an emphasis on building your first web site (this is what we do on our MED102 module).  Below you'll find links to his videos and the text-based pages walking you through the various processes.

#1 - Understanding and writing HTML


Here's a link to a handy HTML cheat sheet.

#2 - Styling and CSS


#3 - A site from start to finish


#4 - Choosing a host and launching your site


#5 - Additional resources


If you fancy a .pdf download of all the text then click here to get that.

Monday, 28 March 2011

The basics of video editing

Over on Lifehacker, Adam Dachis has been putting together a batch of easy to follow introductory '101' sessions using non-linear video editing tools as part of their Night School series. These are aimed squarely at those people who have little to no knowledge of big software packages like Avid, Adobe Premiere and Final Cut Pro but would like to know more.  These are some of the packages we use at the University of Sunderland so these videos might help function as simple intros for any of our students out there.

I've embedded all the videos below for ease of use, and included links to the original posts in the title:

#1 - Getting to know your work environment


#2 - Creating a project from start to finish


#3 - Effects and colour correction


#4 - Preparing and encoding your video for delivery


#5 - Additional resources

No video for this segment, I'm afraid.  However, there are some useful things provided in this post, such as a .pdf of all the lesson notes, and some hand links.  Go ahead and click the links and watch the vids.

Saturday, 26 March 2011

Downloading Soundcloud tracks using Firefox's cache

Every now and then some of the people I follow on Soundcloud will upload a track that will never be officially released as a free or purchasable download, and my Interent streaming isn't always reliable (I'm thinking of when I'm at work, grrr).  This means that best option for audio playback will come from a downloaded version of the source.

So, I figured that anything that streams through my web browser must be downloaded or cached somewhere on my machine, meaning that if I can find the data, then I should be able to save that track.  This post will be a little tutorial showing you how to do the same using nothing other than Firefox 4 and Finder on my Mac (I'm sure Windows Explorer will do much the same job).

1 - Prep work

First thing to do, in order to make this easy, is I recommend emptying your Firefox browser cache:

Firefox -> Preferences -> Advanced -> Network -> Offline Storage -> Clear Now

2 - Pick your tune

Navigate your way to the appropriate tune you are after on Soundcloud and play it.  Your browser will cache the data.

3 - Locate the cache

Open another Tab (ctrl/cmd+T) and in the URL field type: about:cache and hit enter.  Under the header "Disk cache device" you should see your Cache Directory where the streamed tune will have been cached.  Navigate your way to the cache folders with Finder/Explorer (Mac tip: copy the text and in Finder hit shift+cmd+g and paste the text to get there direct).

4 - Find the recently used folders

Sort your folders by the date they were last modified and then check each of the subfolders within the cache for data files.  Some of the cache folders will be empty thanks to the prep work we did in step 1, making this a relatively quick exercise.  Providing you haven't used your browser to do lots of searches, you should see very few files, but their filenames will all be a mixture of random numbers and letters.  The largest one you find is likely to be the file you are after.  Highlight it, and copy the file your desktop

5 - Convert the file

What you need to do now is merely alter the file extension to include .mp3 and you should be done.  You can also rename the file to something more memorable.

What you should be left with is a 128 kbps mp3 file of the tune that the SoundCloud artist didn't want you to have.  If you can live with this ethical quandary then fine.  If not, please delete the tune and wait for the day it is officially released.  Obviously, 128 kbps is a terribly low bitrate and should never be played through a decent audio setup for fear of compression shame, but it will be okay for most portable media players until an official release becomes available (which you should buy if you love it so much).

#nb This should be achievable in other browsers like Google Chrome too.

Sunday, 13 March 2011

Google search-fu

Too often I find myself unable to locate content from a specific website despite me knowing it's on there somewhere, and too often do I find myself having to search for those advanced phrases/tools that help pin the required material down.  This post is a tutorial for helping people with their googling skills.  If you want to search Google for a specific site scroll the page a little...

Basics

These are basic tips and tricks that I guess everyone knows about:

Searching by phrase (" ")
- When you place quotation marks around a word or phrase you are telling Google that the word or phase in-between those marks is exactly what you are looking for.  Google will hunt for those words in that precise order only. A search for "John Kennedy" will omit any results for John Fitzgerald Kennedy (unless, of course, both search terms appear on the page!).  This kind of search is very useful for finding direct citations of famous speeches.

Exclusion searches (-)
- If there is a word that you do not want to appear in your search results then simply stick a minus sign in front of the word.  For instance you might want to find a review of the film Inception but not the Blu-ray version, then just stick the minus in front of Blu-ray (eg -Blu-ray) without leaving a space to omit the term.  This is stackable too, so you can add multiple exclusions (eg Inception review -CD -Blu-ray)

Exact search (+)
- This is a little similar to the "phrase" search above but is generally applicable to single words.  Google is good at locating similar words or phrases to the terms we type but sometime we don't want it to find synonyms.  It will bring search results for "green house" if you type "greenhouse", for instance.  Place a plus sign in front of your search term to get exact searches only.

Beyond the basics

These searches might be a little more advanced or refined for the typical googler but they can be very helpful

Number range search (..)
- Sometimes a search might need to include number data across a specified range.  In order to do this you need to add two numbers at the beginning and end of the range separated by two full stops (eg 30..105 will search for data in the range from 30 to 105).  It really comes into its own when combined with other search terms like dates "David Bowie 1969..1972" and weights "1..10 lb butter".  If you include the measurement you can be very specific, even finding bargains, eg. "Blu-ray player £50..100"

Site specific search (site)
- This search feature is tres useful. You better believe it. If you know you've seen something important on a specific site but you can't remember which page you will want to run a search that only hunts for your terms on that site and excludes the rest of the web.  If you employ the search query "Libya site:bbc.co.uk" the results will only include details about Libya from www.bbc.co.uk.  There are variants on this search, such as "Libya bbc.co.uk" (excluding the term site:) but this might bring in searches from other (news) sites mentioning both Libya and the BBC site.  You can also specify a whole set of domains, for example, "Libya site:.gov" will only search government sites while "Libya site:.ly" will only search Libyan sites for the search term.

Wildcard search (*)
- The * icon, AKA the wildcard is a very useful little tool. It acts like a Boolean function that stands in for a number of variants in a search, and tries to find what it thinks is relevant.  Say for instance you run a search for "Apple *" will give you a list of Apple products and services - different to a search for just "Apple".  You can even use it multiple times in a search to find stuff out, for example "* gb iphone 4 costs * " will bring you results based on the different hard drive sizes and their relevant prices.

The OR search (OR)
- Usually every word in a search is counted (except for common words like "and", "the", etc) but you can use the common term "OR" in capitals to distinguish between certain results.  Say you wanted to find the year associated with a specific event like the FA Cup winners but you weren't sure of the date then you could enter a search like "FA Cup 1999 OR 2000" to find info about either one of these years.  A search without OR in it, "FA Cup 1999 2000", will include pages that show both those years on that page

Synonym search (~)
- If you want to look for some term and all the synonyms for that term then place a tilde ~ immediately in front of the word.  This is useful for finding related issues. A search for "~alcohol ~facts" will pull thought all sorts of information about health, nutrition and even support advice.

These are just a handful of the Google search operators that will improve your search kung-fu.  You can also use them in conjunction with each other.

Monday, 28 February 2011

How To: Virgin Media Super Hub + Apple Time Capsule

I've recently upgraded my broadband with my cable provider Virgin Media, from 20 to 30 meg.  As part of this process I was advised that my existing modem would be incompatible with the upgrade so I was going to be sent their wonderful Super Hub (a custom Netgear box).  The problem was that this Super Hub is a wireless router and that it wasn't quite compatible with my existing home network: an Apple Time Capsule and an Airport Express.  If I was to connect the Time Capsule to the Super Hub I'd run into the dreaded double NAT problem whereby each of the routers would try to allocate all the devices on my network IP addresses, causing all manner of conflicts.

Ideally, all the Super Hub needs is a kill switch to make it act like a modem and nothing else. But it doesn't.  This is a much maligned piece of kit that many customers have been grumbling about.  However, it can be tweaked.

I couldn't find any instructions for doing this, but I managed to piece together the relevant processes from posts on the Apple Discussion forums as well as the Virgin Media site (kudos to Seph).  What I'm going to do in this post is show you how I managed to disable the wireless capabilities of the Super Hub so that my Time Capsule can act as it should.  The same should apply to anyone using an Airport Extreme (the Time Capsule include this hardware) router too.

Before I started I jotted down the MAC address (aka Airport ID) of the wireless devices I was using (my MacBook Pro and the Time Capsule).  On a Mac you get to these by navigating to the following:

System Preferences >> Network >> Advanced >> Airport

The Airport ID should be at the bottom of the dialogue box.

How To:

1 - Plug the Time Capsule router’s WAN port into any of the LAN ports on the Super Hub.

2 - Plug the computer/laptop into any Super Hub LAN port and access the management page by typing http://192.168.0.1 into the address bar.  Login with the details from the back of the Super Hub and click the Advanced link
Click to expand

3 - In the left-hand navigation column, under Advanced, select the LAN IP option.  Examine the DHCP Client Lease Info field; you should see your computer and the Time Capsule (plus any other connected devices if you have them). If you haven't already, make a note of the MAC address from the Time Capsule and add it to the DHCP reservation section.  After that, give the Time Capsule an IP address like 192.168.0.10

Click to expand
4 - Next step, navigate to the DMZ host page on the Super Hub from the left hand column and enter the same IP address (e.g. 192.168.0.10) in the appropriate field. This means that the Super Hub will pass all traffic to the second router without any checks or filters. The Time Capsule will be in the same subnet as the router side of the Hub.
Click to expand

5 - Turn off or disconnect the Time Capsule and connect your computer to it with a network cable. Reboot it.  At this point launch Airport Utility - the Time Capsule will be reporting an error.  It needs to be put into Bridge Mode (either via the method below or by using the diagnostic tool):

Manual Setup >> Internet >> Internet Connection >> Connection Sharing >> Off (Bridge Mode)

Click to expand
6 - At this point you are almost ready to go.  All we need to do is disable the wireless functions on the Super Hub. Login to the router again http://192.168.0.1 but don't go into the Advanced mode yet.  Simply select Wireless Network Settings and change the Wireless mode to Off then hit Save.

7 - Log back in to the Advanced mode on the Super Hub http://192.168.0. Navigate to the Services tab under the Content Filtering option in the left hand column.  Once there deselect the Firewall Features and  IP Flood Detection and hit Apply.
Click to expand

You should be good to go now.  Your original wifi network will be functioning as normal and the Time Capsule will be taking care of business.  I did a quick ISP speed test and it looks like I'm getting the full 30 meg speed.  Nice.

NB: Virgin Media are planning on upgrading the Super Hub's firmware and testing it around April time

Sunday, 20 June 2010

"My Sunderland 2.0" - implementing our own bespoke social network

On Monday I've been volunteered to present at our media team away day on how best to implement and use various web tools to aid student engagement with module content.  I don't have too much time to spare as there are a few other people presenting in the same session, covering things like:
  • the integration of our community radio station, 107 Spark FM, into our production modules
  • the development of iPhone/Android applications for learning
  • the use of social media, like Facebook study groups, Delicious social bookmarking, Twitter hashtags, etc
One of the things the University has been building and implementing over the past 6 months is its own attempt at a social networking site for staff and students, as a riposte to some of the security and privacy concerns that have been associated with delivering educational content across different third-party commercial sites.  This is where "My Sunderland"comes in...

We've already had a central launch point for staff and students to locate the types of content they may find useful (ie the original My Sunderland), such as access to the VLE, module catalogues, telephone directories, docushare, etc,  but, as has been evidenced from the many staff blogs and study groups across various social media sites the existing provision for actually engaging in a dialogue with students has been pretty clunky or restrictive.  In particular, I'm thinking of the "Discussion" tools in WebCT here - the user interface leave a lot to be desired and is hardly intuitive (for staff or students).  Student feedback on this issue regularly points out that learners prefer to discuss their module content in more familiar surrounds that are easily navigated, hence the plethora of Facebook groups for many of our modules.

Enter "My Sunderland 2.0"

In January this year, a new beta version of My Sunderland was launched which seeks to offer staff and students a bespoke communication space with all the features and facilities of the earlier space, but now dressed in the guise of a funky Web 2.0 social networking site - think of this as "My Sunderland 2.0".  This site offers a lot of interesting feature that were missing from our earlier offerings - we can create blogs/pages/communities around all manner of content, from community events or things happening on campus, to self online modules capable of hosting audio and video content.  Best of all, everything that can be created can be given its own privacy setting from the following options, meaning that only the people you want to see the material can see it:
  • Private (only the creator)
  • My Friends (only people who have accepted friend requests on the service)
  • Logged in users (all users of the My Sunderland service)
  • Public (the entire web)
  • Community xyz (only group members of specific user created communities)
These are quite powerful privacy options.  Many staff find it uncomfortable befriending students on social networking sites like Facebook as there have been many instances of students who have exploited that relationship, either by verbally abusing staff members or abusing the fine line that demarcates the public and private spheres.  I'm sure I'm not alone in having been contacted inappropriately by students around assessment time.  Of course, it goes both ways.  There are many a time I've witnessed students talking about their nocturnal activities or their great feats of alcohol endurance over an assessment period, only to be contacted by them begging for an extension of some kind.  Facebook filters are nebulous and often difficult to keep track of, but with these My Sunderland controls only the people you want to see the content are going to get the message(s) you post.

There are several other features that are available, and I'll list a few with a brief description below:
  • The Wire - this is a status update service akin to Facebook or more appropriately Twitter (140 character limit)
  • Pages - a homepage which can be used host information and subpages
  • Communities - create and manage your own communities based around modules, classes, interests, etc.
  • Blogs - maintain your own personal or committee-specific blog
I'm going to create a few simple screencasts walking people through the basic features and I'll embed the video in an update to this page in a few hours...

Any staff member or student can login into the new My Sunderland space, so go ahead, try it out now.

[UPDATE]

Video walkthroughs of the basic tools and features can be found below. Click through for HD versions with better resolution.

The profile tool


The wire tool


The dashboard tool


The blog tool


The activity tool


The communities tool


Overall, there is a lot of potential here.  WebCT is fine for uploading .doc or .ppt files, but for anything else third party solutions have tended to be the order of the day (embedding Slideshare presentations or YouTube videos live in the page).  If you wanted to get creative, you really had to know a little bit of HTML or create distinctive spaces within a module space.  For instance, the headers and the footers of a folder were editable with HTML with the centre of the page being given over to hosting files, but the pages seemed clunky to use and ugly to look at.  Also, a module space could be hard to navigate.  By adapting the look and feel of common social media tools My Sunderland 2.0 seems to offer a more customisable and friendly interface to staff with more rudimentary tech skills.

Remember, it's still in the beta phase o there may be bugs that need ironing out still.  Let me know what you think

Wednesday, 23 December 2009

Make your own iPhone ringtones for free using iTunes

It's Christmas so here's a little gift for you. This is a step-by-step tutorial showing you how to make your own iPhone ringtones for free, meaning you don;t have to pay over the odds prices for expensive ringtone in the iTunes store. All you need is iTunes and your music library.

The tutorial was written on a Mac and the screengrabs refer to a machine running OS 10.6.2 but it's a very similar process for Windows users. You can view the images over on Flickr here. You should also be able to see full size images there if you need them. I start with the presumption tht most people will have their music library setup as .MP3 files. If your music library is mainly .AAC files then this tutorial is not for you. The same method can be employed but there is an extra level of complexity involved which involves converting files to any other format

And so, on we go...

Step 1


Open iTunes
itunes a

Step 2

First thing we need to do is setup iTunes. Go to Preferences. On Windows, select Edit. On Mac select iTunes or hold "cmd+,"
itunes b pref

Step 3

A pop-up should have opened on the "General" tab. Navigate down to the "import Settings"
itunes c pref general copy

Step 4

We need to make sure that files will be imported and encoded as .AAC files (Apple's preferred format for the iTunes store). Make sure the "Import Using" field reads "AAC Encoder" - the "Setting" field can be a number of different settings but the "iTunes Plus" setting is a decent enough quality setting for a ringtone. Select OK and go back to iTunes main dashboard
itunes d pref general import

Step 5

Find a song in your library that you want to turn into a ringtone. Right click the track and select "Get Info" (Mac keyboard shortcut: "cmd+I")
itunes e get info

Step 6

A popup should open
itunes f get info

Step 7

Select the "Options" tab and pay attention to the "Start Time" and "Stop Time" fields
itunes g get info options

Step 8

Ringtones can be up to 30 seconds in length. In the "Start Time" and "Stop Time" fields enter the time frame from your song of choice and ensure the boxes to the left are ticked. I've just selected the first 30 seconds of your chosen song but you can pick the middle or the end - whatever you like. Select "OK"
itunes h get info options 2

Step 9

Back at the main iTunes interface, right-click on your track and select "Create AAC Version". iTunes will now create a 30 second (or whatever time frame you selected) version of the track in the .AAC file format
itunes i create AAC

Step 10

After a few seconds you should see two versions of your track in the iTunes library - one for each file format. The new file will be smaller in file size and shorter in length
itunes j two files
Step 11

Right-click on the new .AAC file and select "Show in Finder". There should be a similar command in the menu for Windows machines.
itunes k show in finder

Step 12

There should new be two copies of the file on your machine, with the one you want being highlighted. They should be distinguishable by their file extension. We are looking for the .m4a file
itunes l in finder

Step 13

Select the file name as we are going to edit the extension. Mac users can just press "Enter"
itunes m change file name 1

Step 14

Change the .m4a file type to .m4r
itunes n change file name 2 copy

Step 15

You may get a popup at this point, asking if you want to change the file type - which you do!
itunes o filen name copy

Step 16

Now, import the new file into iTunes by either dragging or double clicking. The file should now appear and the file kind will read as "Ringtone". Drag the file onto you iPhone or select it as a file to be synched when your iPhone is connected
itunes p ringtone copy

Step 17

That should be it! You might want to do a little bit of house-keeping by going back to the original .MP3 and going into it's "Options" tab and deselect the "Start Time" and "Stop Time". If you donlt do this, you iTunes libraary will only ever play the selected file as an abridged version!
itunes q clean up copy

Hope that was easy to follow. Go and have fun

Merry Christmas!

Monday, 4 May 2009

What Spotify could do with...

I am of the humble opinion that Spotify is a great service. Decent quality streamable music on demand with adequate range of artists to please most people. An extra 43,000 tracks were added this week). It has a very simple service with clean and easy controls that ape the ubiquitous iTunes interface making it an attractive piece of software for newcomers. It's also got a range of price points from free to £9.99 per month to have the ad-free service.

However, it is far from perfect and needs to do more in order to convince this user that it can justify the premium price. One of the things that Spotify does very well is its playlist sharing feature. You can do in Spotify what users of iTunes have been doing for years - creating the perfect mix of tunes for a given mood or situation - but it improves on the Apple service in that it lets you take that playlist and share it with friends. Now you can legally share tunes with your friends online in such a way that alleviates any guilt associated with piracy.

Creating the perfect playlist can be a time consuming experience: finding the right compositional balance of tunes, sequencing the music appropriately, working with self-imposed 'rules'*, etc. It is very easy to get sidetracked whilst you plough through your music catalogue.

Using iTunes to create playlists is pretty hassle free. Using Spotify to create playlists is also hassle free. I've made iTunes playlists for several years now and have a quite a few that I'd like to share but that isn't really practical with iTunes. Sure, you can create an iMix but that involves your friends having to buy tunes to hear your creation. Plus, if Apple doesn't have all the artists in their store then your playlist can be decimated. Along comes Spotify to fix this problem. Except it doesn't.

If you want to share that playlist that you've created in iTunes, you have to manually search, find, drag and drop all the tunes you want in Spotify. As we've already established, this can be time-consuming, and not something you want to repeat after having already done that same process in another peice of software. One thing Spotify could do to improve the overall experience would be to add an import playlist feature. iTunes does enable you to export your playlist to a text file. If only Spotify could import that file and save you the hassle of having to do it manually.

I'm not sure that this one minor improvement would convince me to pay for the premium Spotify service but it would certainly help eat into my iTunes loyalty. The video below shows you how to create and share a playlist with your friends. If you haven't already done this then give it a go. It's free and easy. It just might not be fast.

How to create and share playlists from Spotify on Vimeo.

* I have an irrational tendency to enforce a strict 'one track per artist only' rule. This causes me many problems - all of my own making.

Thursday, 16 April 2009

Upgrading a PS3 hard drive and avoiding the problems other guides forget about

#NB: an updated version of this guide covering firmware 3.55 can be found here

This is something I have done twice now and I thought I'd share my experiences. There are lots of other guides to doing this online and they are pretty good - it's how I managed to do it the first time - but they often omit a couple of bits of information which might pose problems if you don't quite know how to handle them.

Upgrading the PS3 hard drive brings with it a number of benefits, especially if you own a lot of games, and also if you use your Playstation as a media centre for photos, movies and music. Don't forget that you can partition the drive and install Linux on the Playstation too. My original 40gb drive was almost full after 6 months and the 80gb replacement I first installed was full within 12 months.

This process should not invalidate the warranty.

What you will need
  • New internal hard drive - this will be the drive that you are going to put in the PS3
  • External hard drive - this will be the drive that you use to backup the original hard drive (game data, saves, media files, etc)
  • USB flash drive - this will be used to install the Playstation firmware (currently v2.70 as I write this guide which comes in at 142.5mb)
  • Phillips head screwdriver - for removing the drive
  • PS3 controller and USB cable
Sourcing a replacement drive

This is quite important but shouldn't pose too many problems. Not every drive will fit in the PS3 so make sure you check the following:
  • SATA - the drive must have a Serial ATA interface, not the older IDE or ATA formats. You should be able to pick-up a good quality 250gb Western Digital or Seagate drive for around £45 from ebuyer. Larger capacity drives are a little more expensive but still affordable.
  • 2.5" - the drive should be 2.5" in width, typical for laptops. If you have an old laptop drive then you could use this (I pulled a 250gb drive out of my Macbook to dump in the PS3)
  • 9.5mm - this is the correct height for the PS3 and also is typical. However, there are some thinner and larger drives on the market so watch out.
  • 5400 RPM - there are drives that spin slightly faster at 7200 RPM but they are more expensive and I've seen rumours online that they may overheat for the tiny speed advantage you may get. I can't vouch for that rumour as I've never installed a 7200 RPM drive.
Step 1

Now that you have sourced a new drive and have all the material listed above, the first thing you need to do is backup the content on the PS3 to a removable USB hard drive. I've found that it helps if you the drive you are using as backup is already formatted in the FAT32 file format and that it has enough free space to take the contents of the internal PS3 drive. You can convert your drive using Disk Utility (Mac) or Disk Management (Windows), or even just create a partition on the external drive large enough to accommodate the PS3 content.

Once you are sure you have you FAT32 formatted drive ready, connect the USB hard drive to the PS3 and the system software will automatically recognize the external USB hard drive, allowing you to copy the contents.

Step 2

Unlike Microsoft's Xbox 360, Sony have made it very easy for PS3 owners to upgrade their drives cheaply without having to buy official products. You can get twice the space for about half the cost. They've also included some useful software to accommodate the migration process. Your system settings and your PSN info are stored in the PS3's internal flash memory so all we need to consider are the games, games saves, photos, trailers, music, etc.

You have two options here: a full backup or a partial manual backup. I'm going to lead you through the former.

On the XMB (Cross Media Bar) select System Settings, then Backup Utility. Choose the Backup option when asked and finally select your external drive. If you already have a large internal drive of, say 80gb, then this might take a while - my PS3 told me it would take 1 hour 39 minutes.

Step 3

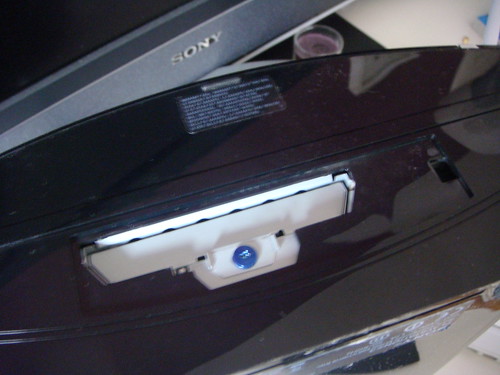
Now that the data is backed up we are going to need to open the PS3 to take the hard drive out. First of all you will need to completely power down the PS3 and disconnect all connections (HDMI, power cable, USB, etc) so that no charge remains. It is advisable to wait about 10 minutes to let the machine cool down too. Take the machine to a flat clean work surface and stand it on the side with the cooling vent (with the stand by switch) so that you can see the hard drive access panel (it should have a sticker on it). Pop this panel off with your fingernails or a screwdriver. The Playstation owners manual even contains details about this process.

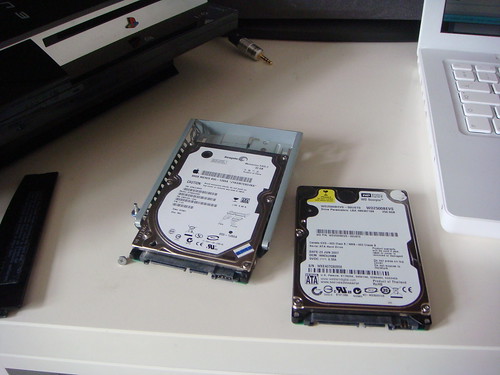
Unscrew the blue screw. Pull the metal handle and the drive tray will pop out. Now, there are four small screws keeping the hard drive in the tray. Now these are cheap and will strip if you force them with an inappropriate screwdriver so use the right tool. Sony will send you a new tray and screws if you do this but your old drive will be stuck (ideally you want to be able to get the old drive and make a portable drive out of it).

Swap the old drive for your new hard drive (label side up) and screw everything back in and plug the PS3 back in.

Step 4

When you turn the power on you will be asked to connect a controller using a USB cable and press the PS button. At this point you will get a message saying the following:
The system software cannot be run correctly. Press the PS button to try to restart the system.

If the system cannot be restarted, the system partition of the hard disk must be reformatted and you must reinstall the system software.
Insert storage media that contains update date of version 2.70 or later, and then press the START and SELECT buttons as the same time.
For information on how to obtain update data, refer to the SCE Web site for your region.
NOTE: Most sites offering upgrade advise skip this section, hence my post so pay heed to the following section

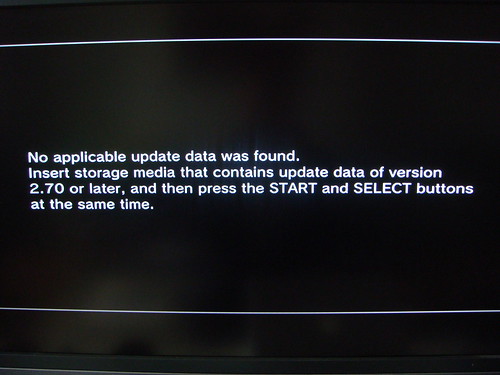
If you do press the PS button you will end up in a feedback look unless you connect a USB drive with the v2.70 firmware to the PS3. You can't just copy the file over to the USB drive. That would be too easy. No, you must create a folder on the USB stick called PS3 and then another folder in that called UPDATE and place the firmware file in there in order for the PS3 to read it. Do this now and press START and SELECT.

If you don't create the USB directory exactly like that, you will get the following message:
No applicable update data was found.
Insert storage media that contains update data of version 2.70 or later, and then press the START and SELECT buttons at the same time.
Now that you've done that, and followed the onscreen instructions to format the new drive (we want to do this) we can start the next long part of the process.

Step 5

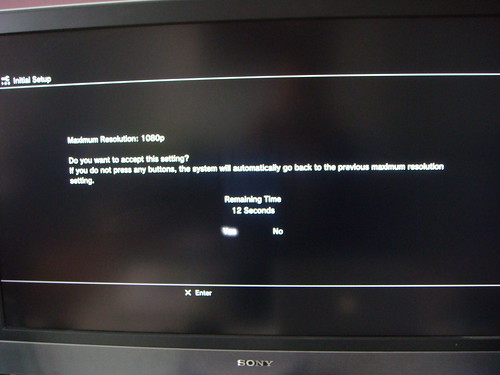
Most likely your PS3 asked you to agree to installing the new firmware, and then it automatically restarted itself when you agreed to the terms and conditions. Select your language of choice. If you have an HDMI connection the PS3 will detect it automatically and ask you to switch to the optimal settings - agree to this.

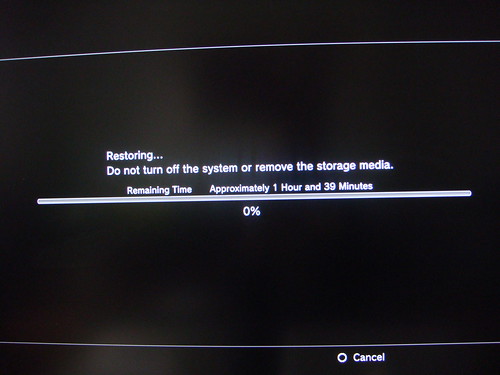
Select a time zone; set the date and time; add your preferred user name before entering the Internet Connection Settings. Work your way through the configuration screens. Eventually you will be able to get to the XMB. Plug-in your external drive with the back-up data, then head over to System Settings, then Backup Utility. Choose Restore when asked and finally select the device you backed everything up to. This is the second major time killer moment as the data gets restored. Restoring my 80gb drive worth of data took 1 hour 39 minutes.

Step 6

After all that, your PS3 should be ready for business. You can even go on to install Linux if you want but I'm not going to cover that in this post. I might do that later, but it requires another reformat and a bit of time. If you want to do this then make sure you backup your new install first or keep that drive you copied somewhere safe. You could even use the old drive as a backup resource. However, you will need to ensure all game saves or new data are copied manually.

All should be well. Most guides advise you to keep your old drive somewhere safe in case you have any problems in the future. You can do that but if you are out of the warranty you could always buy a hard drive caddy and turn your old drive into a portable drive. Caddies are cheap at about the £6 mark from most computer shops.

The original 40gb drive I took out of my PS3 was a Seagate drive and it stated on the sticker that you shouldn't put the drive in another laptop. It doesn't say anything about caddies.

Friday, 29 August 2008

iTunes: The song could not be played because the original file could not be found

This morning I awoke to an iTunes nightmare, one which has happened to me a few times before and one that has caused me to lose whole days trying to fix in the past. The problem goes like this:
  • Boot up iTunes
  • Select some tunes to play only to see an exclamation mark beside the track name
  • A dialogue box appears telling me that the song could not be played because the original file could not be found. I've added a screen shot below (click through for full screen):
Free Image Hosting at www.ImageShack.us

I scanned through the rest of my library and little exclamation marks popped up everywhere.

Now I have a library of over 25,000 tracks the vast majority of which were missing. If you only have a few tracks missing then, okay, you can merely locate each individual track by double clickiing it and locating the file in Explorer/Finder which shouldn't take you too long. However, 25,000+ tracks is a serious time suck.

I will detail an easy solution to this problem in a moment, but before I do that I will detail exactly what happened.

It seems like iTunes had took it upon itself to create a subfolder within my user designated music folder and was only looking in there for my music, hence it couldn't see the larger library - see the image below:

Free Image Hosting at www.ImageShack.us

iTunes had created a new directory at D:\My iTunes\iTunes Music when it should have been D:\My iTunes\ as it had been 24 hours prior. You can find where iTunes stores your music by hitting [ctrl+,] on a PC or [⌘+,] on a Mac. Alternatively click Edit - Preferences - Advanced - General.

I have only recently just reinstalled XP on my office desktop, cleaned up all my files and created multiple partitions - one for system files and programmes, one for data, and one specifically for music in the event that if something went wrong on one, the others would be fine.

Solution

My solution to this nightmare was rather straightforward. I've learned from previous mistakes you see. In the past I had been told in the Apple forums (by some noob!) to select all my files in iTunes and hit delete, then reimport them again (be selecting File - Add Folder to Library). Be warned, this is a laborious process which takes an age and also erases all your ratings, playlists, and sometimes even your ID tags. Not ideal. Apple have a related article on their support site which advises similar, but is more a touch more cautious and involves the import command.

Other solutions I have seen involve hunting down your iTunes Library.itl file and rebooting iTunes by clicking on its icon (either in XP's Quicklaunch Toolbar or from OSX's Dock) whilst holding down the Shift key. You can then point iTunes to the library file. This solution only works if that file is intact and not corrupted in any way. It is a good idea to make regular backups of your important files - I have a folder set up in which I keep a weekly backup of the iTunes Library.itl file in the directory above my iTunes folder (see below):

Free Image Hosting at www.ImageShack.us

This has saved my music collection a few times and I can't recommend it enough! It's well worth backing this file up to an external source somewhere too, in case you have a total hard drive failure.

Anyway, like I said, my solution to restoring my iTunes collection was pretty straightforward. I selected Preferences - Advanced - General, changed the location of my iTunes Music Folder back to where it should have been (D:\My iTunes in this specific instance) and iTunes automatically did the rest. I had to do a quick scan through the library to see if there were any outstanding exclamation marks or duplicate files, which took a few minutes.

There were between 10-15 tracks which did just seem to have vanished from my hard drive, for which I have no explanation. As I said above, it is good practice to regularly backup files - I use the free version of SyncBackSE from 2BrightSparks to schedule a regular backup of my music to an external drive. It's easy to use and a godsend. It was a simple matter of dragging files from my external to the correct location on my internal with iTunes open - they played straight away.

I did notice some other strange behaviour within iTunes' preferences. I always have iTunes make a copy of the music it imports into my music folder but this option had been disabled - see below:

Free Image Hosting at www.ImageShack.us

I have no idea how or why all this happened but I'm glad I spotted it as files recently imported from utorrent had stayed on my E: drive which I usually erase very frequently. I did recently uninstall Adobe CS3 using a WinCS3Clean Script before reinstalling. I have had a few system problems since then, notabley utorrent reporting its inability to downloadsome files (error: requested operation cannot be performed on file with user-mapped section open).

Problems like this are few and far between but they do happen (too often!) and it makes me wonder why I persist with iTunes. However, being a PC and Mac owning household, the benefit of seamless file sharing from the PC into Front Row is just too good to give up on. I love being able to port my music around the house via the Macbook, connecting it up to any of the amps in the different rooms without having to clutter my smaller hard drive.

System: XP Pro SP3
Software: iTunes 7.7.1.11

If you've had similar nightmares, or if this advice has been of some help, be sure to let me know in the comments section.